How to Install and Initialize FygoOS?
You can install and deploy FygoOS on your device. We support mainstream x86 and ARM architecture hardware.
The following are x86 installation steps.
Please click here for the installation guide of ARM RK series CPUs.
1. Download the Installation Image
Go to the Fygo official website to download the latest system installation ISO image.
2. Create a Bootable Drive
In this step, you need to use a disk writing tool on your computer to flash the image file onto a USB drive. The USB drive can be removed after the installation is complete. You can use tools such as Rufus (Rufus 4.5 Download, Rufus 4.0 Download) or Balenaetcher. The following example uses Rufus:
1. Select the USB Drive to Write To

2. Select the Downloaded Image

3. Click Start
When the progress bar shows "READY", the process is complete. You can remove the USB drive.

3. Install the System on the Device
1. Device Preparation
-
Connect at least one hard drive to the machine for use as the system drive. An SSD is recommended for faster system performance.
-
Connect the machine to the network via Ethernet cable. Installation with only a wireless network adapter is not currently supported; support is planned for the future.
-
Connect the power supply, monitor, keyboard, and mouse (mouse is optional).
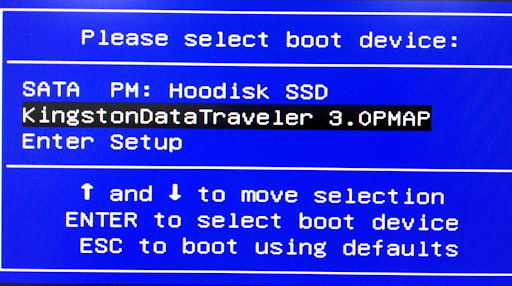
2. Select the Bootable Drive
Insert the prepared bootable drive into the machine. Press the power button to turn on the machine, and quickly press the keyboard hotkey to enter the boot device selection screen. The hotkey varies by motherboard — it could be F2, F7, F8, F10, F11, F12, Esc, or Delete.
Select the bootable drive and press Enter to proceed to the installation screen.
3. Select Installation Method
It is recommended to select Graphical Install, then press Enter to proceed.
Note:
- If the screen shows "Installation is not supported in the current mode. Please disable Secure Boot in BIOS and try again", refer to point 1 in Troubleshooting System Installation Issues.
- If you encounter an error during the graphical installation steps, restart the device and select Rescuing Install (emergency installation mode) at this step to retry.

4. Select the System Drive
Use the arrow keys to select the hard drive for system installation, then press Enter or Alt+N to proceed.

5. Set System Partition and Swap Size
When the system drive has sufficient capacity, it is recommended to set the system partition to 64 GB. If installing on a virtual machine, you can reduce the size as appropriate. The Swap partition size is pre-calculated based on physical memory; you can adjust it according to your hardware.
Note: On FygoOS, the system is installed on a single hard drive. The remaining space on the system drive (beyond the system partition) can be used to create volumes for installing applications and storing files. It is recommended to choose an SSD with appropriate capacity as the system drive.
After confirming, press Enter or Alt+N to proceed.

6. Confirm Formatting
The selected system drive will be formatted and all data will be deleted. Press Enter or Alt+O to confirm and start the installation.


7. Configure Network
After installation, the network configuration screen will appear automatically. The system will detect connected network adapters and obtain a dynamic IP. If DHCP is not enabled on the network adapter, you will need to set the IP manually. After confirming, press Enter or Alt+S to save the settings.

8. Restart the Device
After the network settings are saved, you can remove the bootable drive from the machine. Press Enter or Alt+O to restart the system.

9. Restart Complete — Enter Terminal
After the device restarts successfully, it will automatically enter the terminal login page, which means the system has been installed and started successfully. Note the IP address displayed — you will use it to access FygoOS through a web browser. You can now disconnect the monitor, keyboard, and mouse from the machine.

4. Access FygoOS via Browser
Open a web browser on your computer and navigate to the IP address set in the previous step. On your first visit to FygoOS, you will need to complete 2 simple initialization steps. Click Start Your NAS Journey to begin initialization.

1. Set Device Name
The device name supports numbers, English letters, and hyphens (-). It cannot start or end with a hyphen.
2. Set Administrator Account
FygoOS users are divided into administrator users and standard users, and multiple administrators can be created. The first administrator is the super administrator, which differs from other administrators in that: it cannot be deleted after creation (only disabled), and SSH access is enabled by default. Please set a strong password to enhance account security.
After confirming, click Enter FygoOS to complete the setup.

3. Enter Desktop
It is recommended to create a volume as soon as possible to upload files and install applications. If your hard drives are not ready yet, you can create a volume later from System Settings > Storage. Refer to How to Create a Volume for more information.

5. Download and Install the App
It is recommended to download the Fygo App. For details, refer to How to Install the App and Connect to Fygo NAS?
Enjoy your Fygo NAS!